Open topic with navigation
(continued from Booking Status)
Service Status
Service Statuses have two main functions. First, within a booking service list they offer a visual indication of the status of the service—Confirmed, On Request, Off Allotment etc.; second, they control (in conjunction with the Booking Status) whether a service is accountable and is able to have voucher generated or a supplier payment made.
|

|
Although the screen labels use the word Voucher, it does not mean that vouchers must be physically printed. It is perhaps more accurate to describe Voucher as the service being made an accountable entity—i.e., a payment can be made to the supplier, regardless of whether a voucher has been printed or not.
|
Service Status Codes can have colours assigned to them so that services in a booking will display in the colour assigned to the status, and a colour palette is provided to set a colour if required.
Service Statuses also play a role in Auto messaging in determining which messages must be sent to suppliers. This is covered in the Message Defaults section of this guide, and in the Message Setup/Auto Messaging section.
The quantity of Service Statuses required will vary on a site by site basis. If iCom webConnect is installed specific service status codes are needed.
|
|
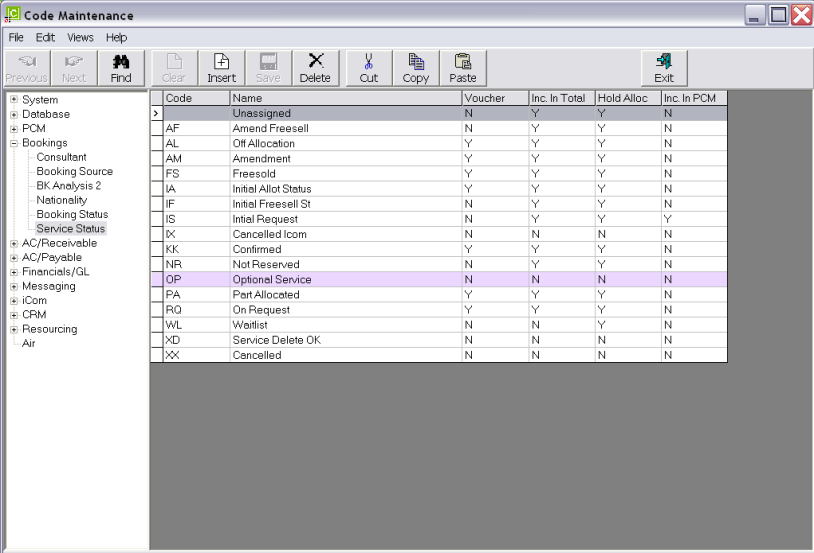
On initial entry to the Service Status node, any existing records will display.
|
Screen Shot 96: Service Status Codes Scroll
|
|
The column headings at the top of the scroll are the only column headings available in this screen.
|
To modify an existing Service Status Description, highlight the row and double click.
To delete an existing Service Status record, highlight the row and click the Delete button in the button bar.
|
|
The Code field cannot be changed. Service Status records cannot be deleted if they have been used in a Booking.
|
To create a new Service Status, click the Insert button in the button bar.
Screen Shot 97: Service Status Code Dialogue
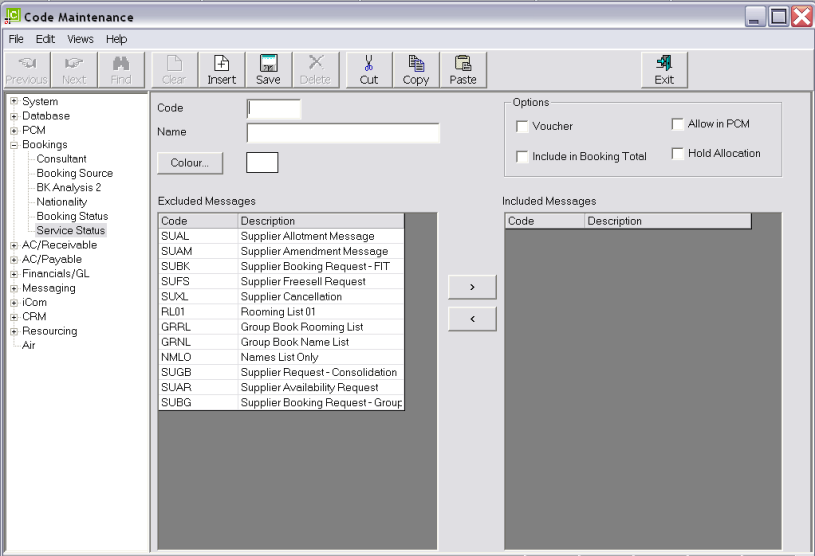
Code (2 Chars)
A code for the Service Status.
Name (20 Chars)
The Service Status Code Description.
Voucher (Checkbox)
Check this box if services with this status can have vouchers created.
|
|
The Service Status voucher checkbox works in conjunction with the Booking Status voucher checkbox. For a service to be able to have a voucher produced the Service Status must allow vouchers and the Booking Status must allow vouchers.
|
|
|
When the Voucher checkbox is checked, the system interprets this as the service being recognised as being able to have creditors transactions applied. This means that once a service in a booking has a service status that allows vouchering, payments can be made to the supplier of the service, without a voucher necessarily being printed. This enables transactions such as advance deposits to suppliers to be made.
|
Allow in PCM (Checkbox)
When checked, the service status will be able to be used in PCMs (Pre-costed Modules, Quotes etc.).
|
|
PCMs cannot become travelling tours without being inserted into a Booking. This means that the use of Service Status codes is irrelevant—within a PCM a service will never be Confirmed or Waitlist etc.—this will occur in the booking. However there may be a requirement to show (e.g.) Optional Sightseeing services in a PCM, so a status can be tagged as being available in PCMs for this purpose.
|
Include in Booking Total (Checkbox)
The service status code determines whether or not the value of a service is to be included in the total booking values. A service with a status attached that does not have the Include in Booking Total box checked will be excluded from the booking total value. This could apply to (e.g.) Optional Sightseeing, Waitlisted services etc.
Hold Allocation (Checkbox)
This setting, when checked, will allow services that have this status to take allocation provided all other rules surrounding the allocation have been met.
Colour (Button)
Clicking this button will open a colour palette so a colour can be attached to the status.
Screen Shot 98: Service Status Colour Palette
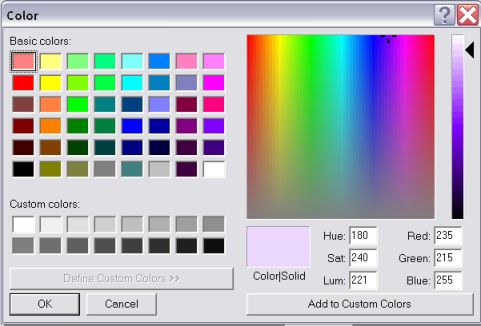
Basic colours can be selected by clicking in the basic colours section at the left of the palette. A primary colour can be set by clicking in the main palette and then dragging the arrowhead up or down until the desired shade is reached.
The colour will display in the booking service list.
OK
Click the OK button to save the Colour against the status.
Cancel
Click Cancel to cancel setting up the colour setting.
To add the colour to a custom palette, click the Add to Custom Colours button. The saved colour will display in the row(s) of Custom Colours.
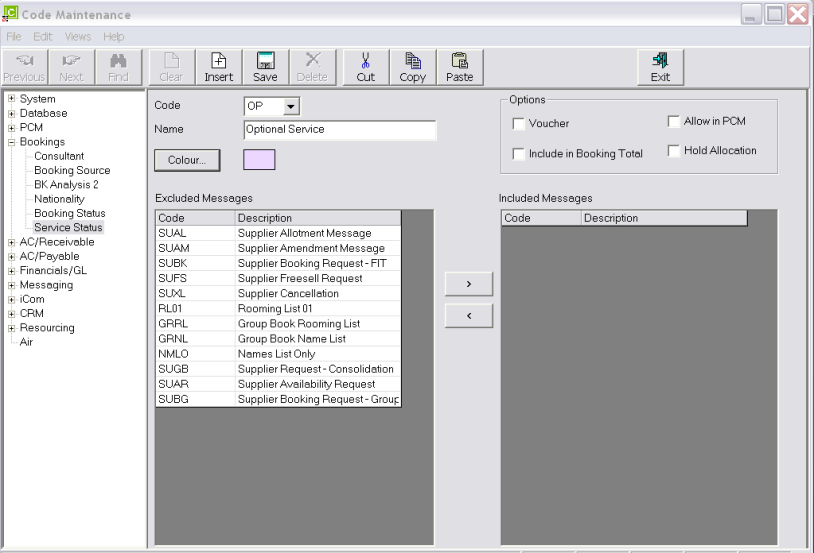
Screen Shot 99: Sample Completed Service Status Detail
|
|
The columns for Excluded Messages and Included Messages are discussed in the Message Defaults section.
|
Save
Click the Save button in the button bar to save the Service Status.
(continued in A/C Receivable)
Open topic with navigation
